 Well its that time of year again. People are getting married and having babies, so I’ve been getting a lot of orders for Wedding Cakes and Cake Pops.
I made the stand for my wedding cupcakes and it was pretty easy so I now offer it as a service to my clients. Since they are made of styrofoam they work equally efficiently as cake pop stands, and so now my pupils, I will impart this knowledge to you. Why? Because I’m just that nice.
P.S. Weren’t my orange and pink cupcakes awesome? The theme of our wedding was “Of all the fish in the sea, you are the one for me!” I loved this little cake topper of the Groom fishing the Bride with a diamond ring.
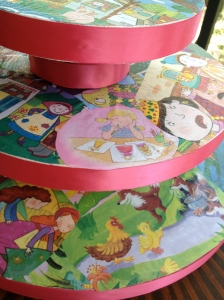
Today I’m going to show you how to make a three tier rotating Story Book Baby Shower Themed cake pop stand.
To make this stand you are going to need the following supplies:
- 3 styrofoam cake rounds. You can get the ones from the cake department, or the ones from the styrofoam dpmt at the craft store. The ones in the cake dpmt are already covered in silver, so if you want silver those are much easier. That is what I used for my wedding stand. If you plan to cover the rounds then go with the white ones, as they are a bit cheaper. For this project I used a 16″ round for the bottom, 12″ round for the middle, and 8″ round for the top.
- 2 separator rounds. I used styrofoam cylinders that were about 4″ for this project, but if you’re making a larger stand you’ll want the bigger cylinders for the base to support the rest of the tiers. Also if you need more space between the tiers go for a taller piece, or glue two shorter ones together like I did for the wedding cake stand. I actually found some at the dollar store but they were square. If you decide to do a square version of this those would definitely work and would be way cheaper. The separator pieces I used were $4 each! Yikes.
- Baby Name Letters (optional)
- Lazy Susan and Dollar Store Pizza Tray (optional)
- 5 yrds of 1 inch ribbon (you will have extra leftover)
- 2 Dollar Store Children’s Books with Lots of Pictures
- Hot Glue Gun
- Dowel Rod and Dowel Cutter
- Mod Podge
Here’s what you do:
 Start by cutting out all the pictures from the story books. Try to cut out nice large pieces and round off the edges. Be sure to fit the pieces on each styrofoam round and cut around the edges to make sure the pieces fit flush along the edge of the round. You’ll want to move the pieces around and position them so they fit nicely before moving on the the next step. Place the pictures so the images are facing out toward the edge. Note: You could do this with any kind of paper. You could have people write notes to the recipient, or print pictures off the internet, or use family photos, magazines, the possibilities are endless!
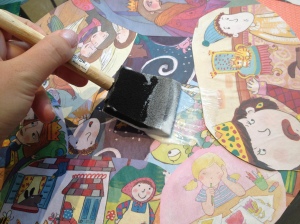
Next, using a foam brush, spread modge podge on the back of each piece and stick them onto the cake rounds one by one. Be sure to get the mod podge all the way to the edges of the pictures so they stick down nice and flat. Once all your pieces are on, paint the whole surface with mod podge being careful to smooth out the paper as you go. Sit them out in the sun to dry for about an hour until they are no longer tacky to the touch.
Once all the decoupaging is dry you can apply the ribbon to the edges. All you need it a few drops of hot glue around the edge. You don’t have to glue the whole piece of ribbon. Just one drop about every 3-4 inches is enough. When you get to the end, fold the last piece down like a hem, overlapping the starting piece and glue down. This will give you a nice finished seam. 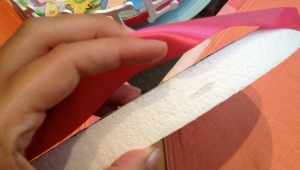
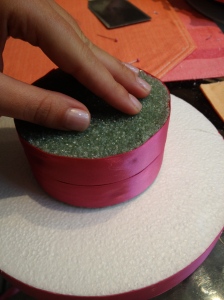
 Don’t forget to cover these little guys with ribbon too. Mine were about 2 inches tall so I did two rows of one inch ribbon wrapped around. If you want to be fancy you can buy 2 inch ribbon and just cover them that way. Don’t worry about the top and bottom as they won’t show.
 I usually like to have a rotating stand. It isn’t always completely necessary, especially for smaller stands, but for larger ones it is nice to have, so people can get to the back of it without knocking the whole thing over. To make it rotate, hot glue a lazy susan to the underside of the base piece. Do this by quickly squeezing a line of hot glue along the uppermost ridge of the lazy susan, and then pressing it onto the styrofoam. Make sure it is perfectly centered.
 You can just leave it like that, but I like to have something for the lazy susan to rest on. This is because the little plastic piece that makes the whole thing turn has to be pressed against a flat surface in order to turn. Usually the table is fine, but I like to have a nice flat bottom to my cake stand, and I just don’t like having this plastic piece being the base because it looks unfinished to me. So I used a dollar store pizza tray which is light and cheap and the perfect solution. If you’re going to do this it is IMPORTANT that you glue the pizza tray to the movable plastic piece, not the outside rim. If you don’t glue it to the movable piece, the thing won’t turn, so make sure you do it right. Also, be sure that the pizza pan is perfectly centered on the turntable.
Now you are ready to assemble. Hot glue the separator pieces to the underside of the top and middle tiers, making sure they are perfectly centered.
 Press the dowel down through the top piece first (upside down), then pull it out and repeat on the second tier. This will make it easier to slide it through the whole thing.
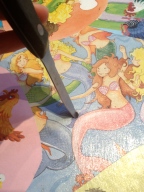 Cut a little slit in the top center of the base round and the middle round to allow the dowel to slide through the decoupaging. Do not cut a slit in the top round.
Press the dowel into the base piece where you cut the slit, then slide the middle tier down. Measure your finished top piece, and subtract 1/2 inch, then cut the dowel down to that height. Snip off the dowel using a dowel cutter (regular scissor won’t cut through it).
Finally, slide your top piece down onto the dowel. 

For a personalized touch, you can add the baby’s name to the bottom tier. This could also be the name of the birthday girl or boy, graduate, or bride. Its a cute way to add a little something extra. I picked up these letters from Michael’s for .99 each plus a 20% off coupon. Just hot glue the bottom inch of the letters directly to the ribbon.
Related articles
- Make your own Cupcake and Cake Display for under $15.00! (bakedbyselene.wordpress.com)
- How to Make Fool Proof Cake Pops (homemakerchic.wordpress.com)
- DIY:cake stand (itsybitsyflowers.wordpress.com)




You are so dang cute!
So creative! I think I’m going to attempt to make cake pops for the first time for my birthday 🙂 Do you have a favorite (and fool proof!) recipe?
Yes I do! I’ve been meaning to post a blog about it but I keep putting it off. You’ve inspired me to get to it this week. Be sure to subscribe or follow so you get a notice when I post it 🙂
Love the book pages as a decoration. Clever idea! Also thanks so much for the link to my blog!
Excellent idea, very cute. Looking forward to the cake pop recipe, too!
Hi Homemaker Chic,
Thanks so much for adding a link on your post to my blog. You have great ideas!
Pingback: Base para cakes – cup cakes | La Cajita Azul de Rocío